
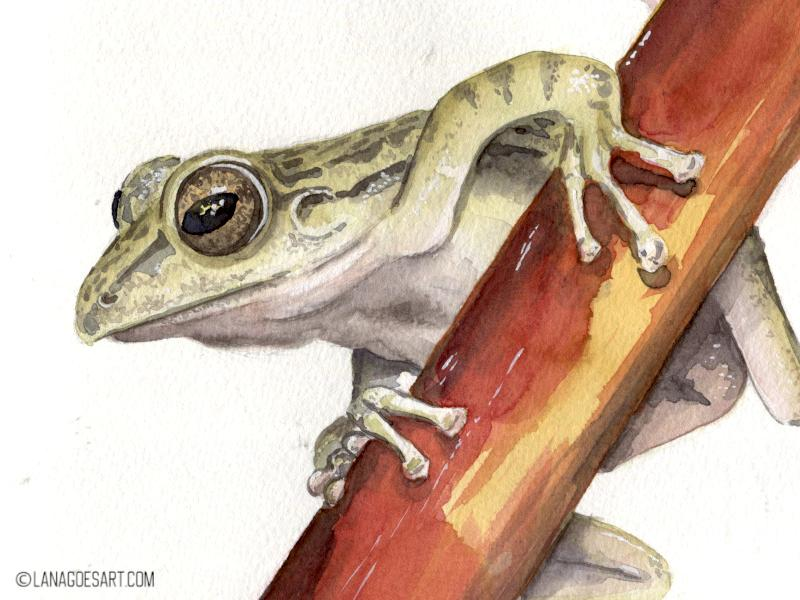
Welcome to another tutorial on this blog! This time we’re painting a frog together - as always in watercolors.
Along with this post going live, there is a stream on twitch, where I will show you the painting step by step. The stream will be edited into a video for my YouTube channel within a week, so you can follow along and paint with me!
Chapters
- A List of My Supplies
- Reference Photo
- 1. Sketch First
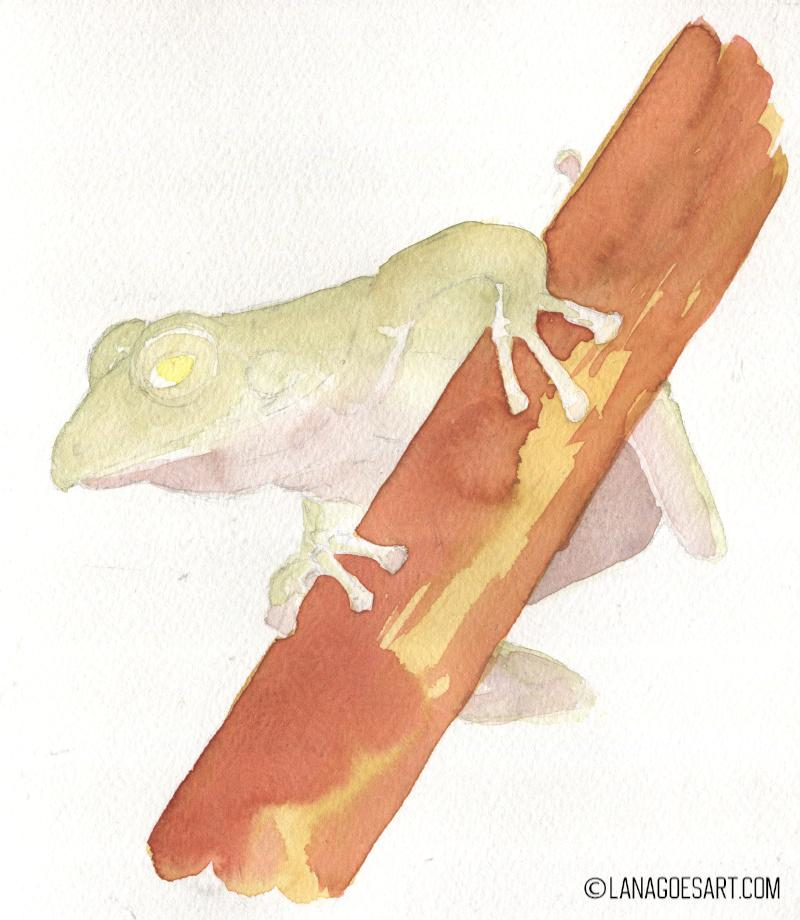
- 2. Frog Green
- 3. Frog Belly
- 4. The Branch
- 5. Add the Shadows
- 6. Deepen the Shadows and Add Details
- 7. Shift Hues Through Glazing
- 8. Add More Details
- 9. Add Highlights
- Optional: Background
A List of My Supplies
- watercolor paper (I prefer cotton)
- watercolor brushes, sizes 10, 6, 4 and 1
- set of watercolors ( I use Schmincke Akademie)
- white gouache, ink or a white gel pen
- pencil and eraser
Feel free whatever you have on hand! I use student grade paints to make sure the result is 100% achievable for everyone. If you have professional paints, use these!
Affiliate links to Amazon were used where possible to help support the site and database. I will receive a small commission when these are used for purchases at no extra cost to you. Thank you!
Video Tutorial
Enjoy also the real time video tutorial, which was recorded during a stream on twitch.
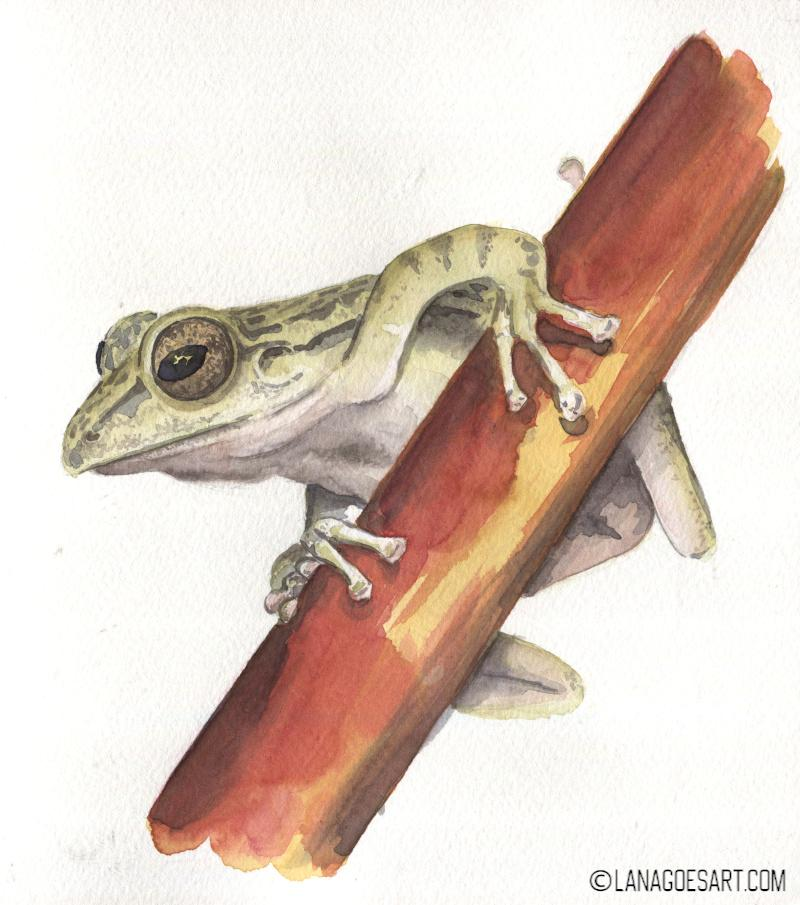
Reference Photo
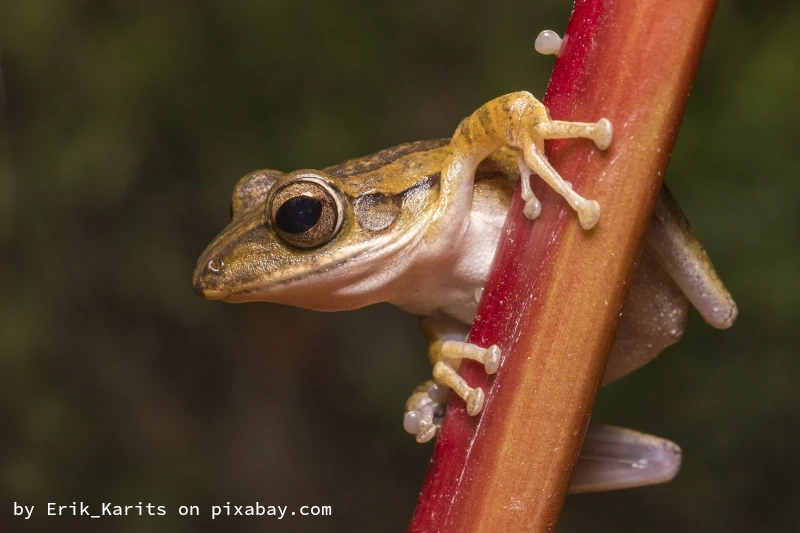
Years ago I painted this frog already using gouache on wood. It turned out gorgeous and I am very fond of this piece. It ended up in a video tutorial even on how to prepare wood to paint on using gouache and watercolors.
So being in a mood to paint frogs again, I went back for this reference photo by Erik_Karits on pixabay.com. It’s a great reference and I hope you have fun painting the frog with me!
1. Sketch First

Use the guide here and sketch your frog using the pencil. If you need to erase do it carefully to not damage the paper surface. A kneaded eraser is best for that. You can remove some of the graphite after you’ve finished your sketch to keep the lines lighter for a more realistic finish.
2. Frog Green
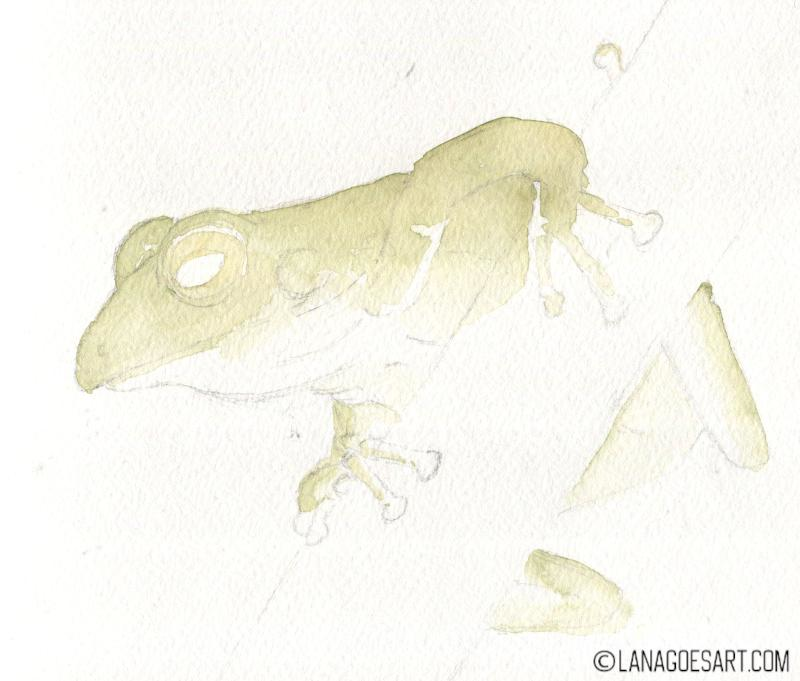
For the green back of the frog mix Yellow Ochre with a little bit of Phthalo Blue. It gives this light yellowish muted green, which looks very natural as a base layer for the frog. Once applied, soften out the edges for a smooth look. Mix a little bit more Yellow Ochre to the mix and fill in the eyes too, leaving some areas free and white.
Tip: How to soften edges: After applying paint, clean out the brush, dab off extra moisture on a paper towel and swipe it over the edge of the applied paint. It will take away the hardness between the applied paint and the dry paper. If needed, repeat the step for a desired result.
3. Frog Belly
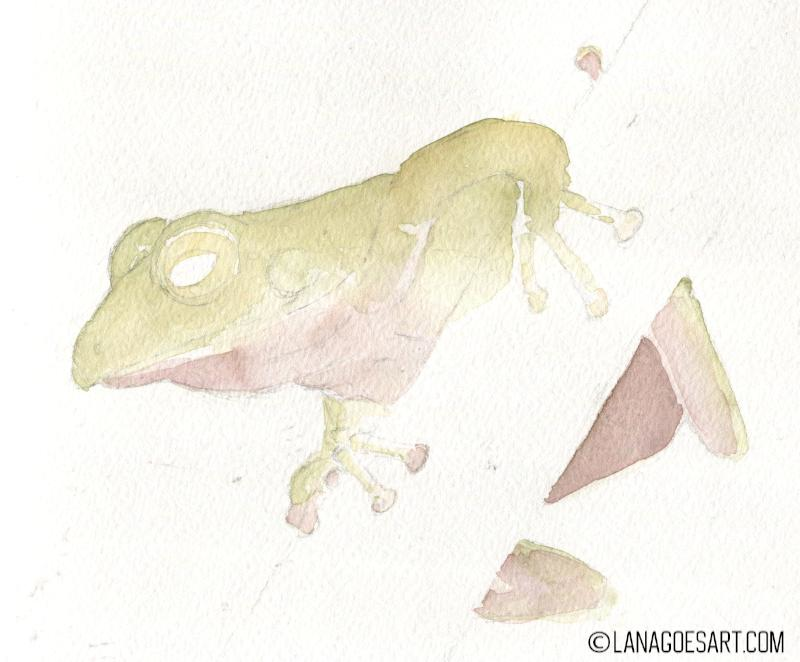
Mix English Red with a little bit of Ultramarine, you can use Burnt Sienna instead of English Red too. The light brownish purple is the perfect color for the belly. Make sure to apply it lightly, so the first layers stay light. Leave out some areas of highlight to keep them white for the rest of the painting.
4. The Branch
Actually I’m not sure if this is a branch, but I like the reddish color, that we will match! Cover the branch first in a middle tone of Yellow Ochre. Then mix Yellow Ochre, some Magenta and a little bit of Cadmium Red Hue into a slightly muted orange and place it on both sides of the branch. Leave the middle free for now, if the paint flows, let it flow. Due to the hot weather my paint dried very fast on paper, so I made little strokes in the middle area for some texture.
While you’re at it, add a little bit of Lemon Yellow to the pupil area of the eye.
5. Add the Shadows
In this step I’m adding all the shadows at once with the same color, it’s a mix of Burnt Umber and Ultramarine to create a deep chocolate brown. With a more intense consistency I add the shadows to the branch and with slightly wetter one to the frog, painting softened shadows on the belly, the butt, legs. Add also details to the eye using the same color and stripes on the frog. Because of the underpainting they will look dark green in the end. With a small brush add also details to the fingers.
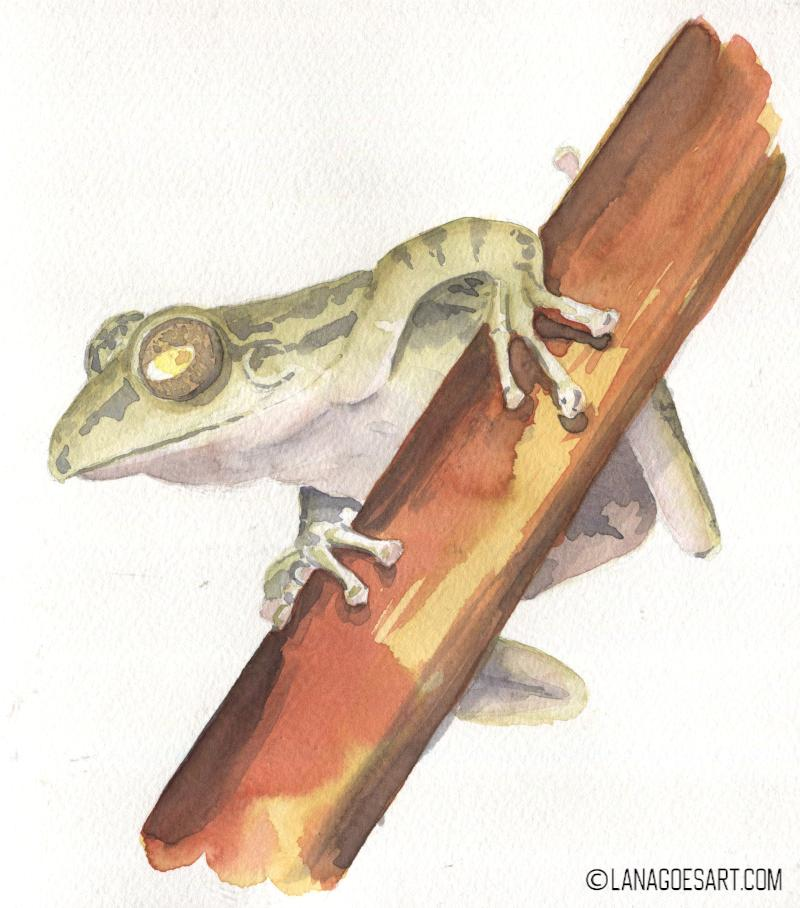
6. Deepen the Shadows and Add Details
Mix a deeper shadow color from Burnt Umber and Ultramarine, leaning brown and deepen the shadows in strategic areas. Like creases and folds on the belly, the mouth, around arms and fingers. Use the same color to fill in the pupil leaving some areas free to show the colors you placed underneath as dots of reflection. Add detail to the nose and stripes and spots of the frog too.
Take care and time with this step, softening out some shadows, especially on the belly, and leaving others strong like on the stripes. Add dotty patterns to the eye and outline it with a thin stroke of the same color.
Pay attention to forming the ear carefully using a strategic placement of shadows.
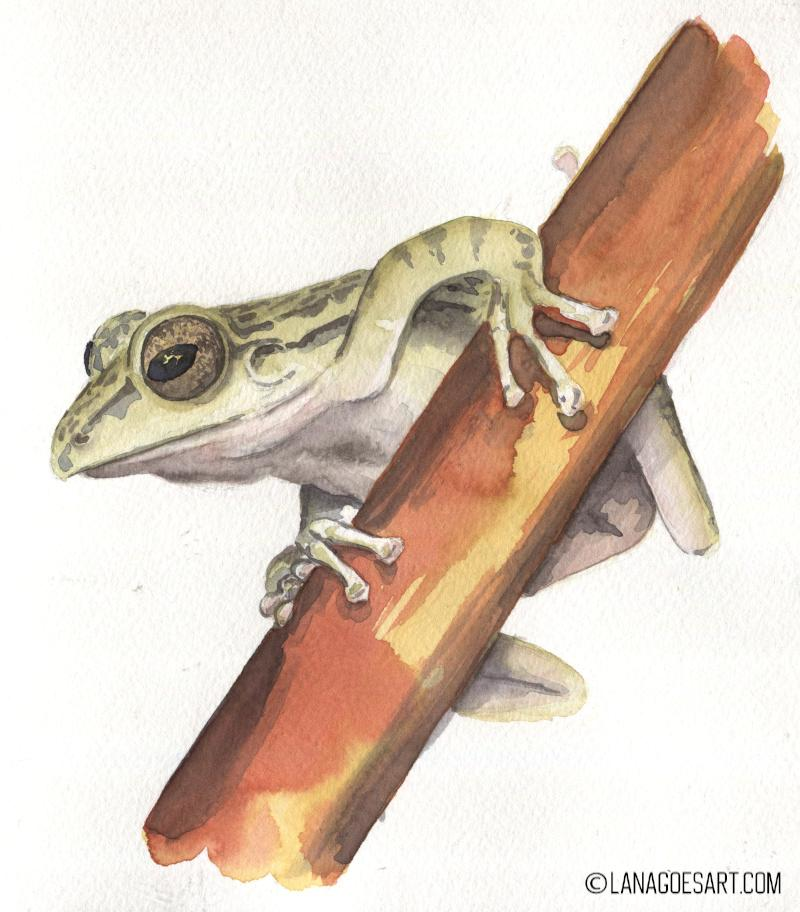
7. Shift Hues Through Glazing
With more colors on paper it becomes apparent that the branch needs a little adjustment in hue. Use Magenta to glaze over the branch especially on the left side to shift the hue into a more reddish area. Leave out areas of pure Yellow Ochre and some of the initial orange we used too.
Tip: Glazing works best, if the area underneath is completely dry and won’t move too much while you apply another layer of paint. Use a soft brush and just a few strokes to cover the area. No rubbing or going over the area several times as this can lift the colors underneath easier.
8. Add More Details
Using the same deep brown shading color ad details to the skin of the frog. Little dots that create texture around it’s mouth, face, arms and legs too. Add details you’ve missed before and deepen the shadows where you feel it’s needed still.
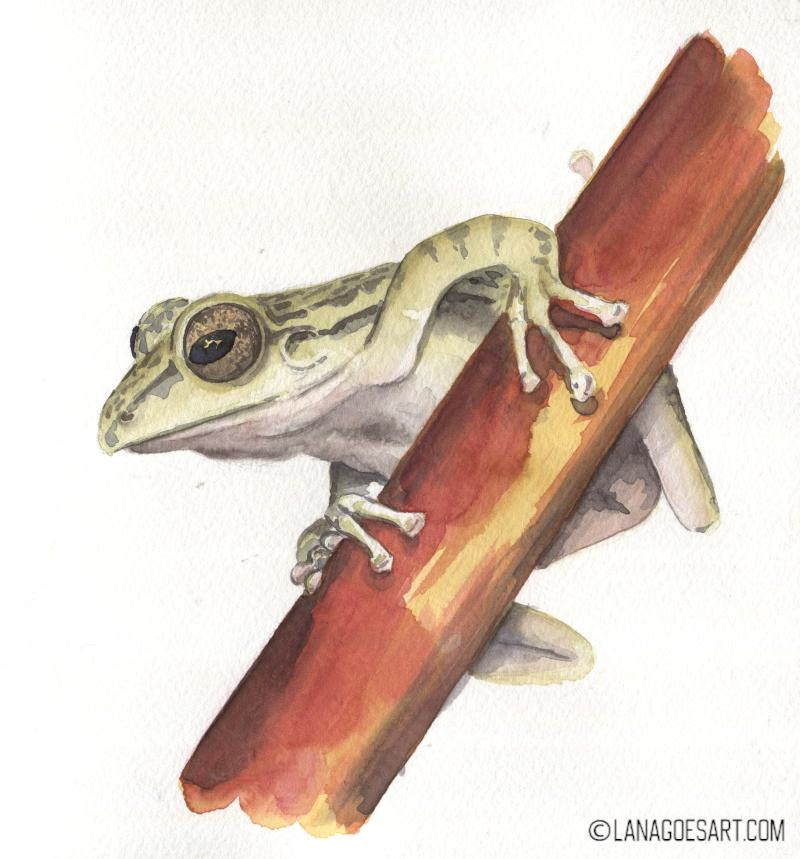
9. Add Highlights
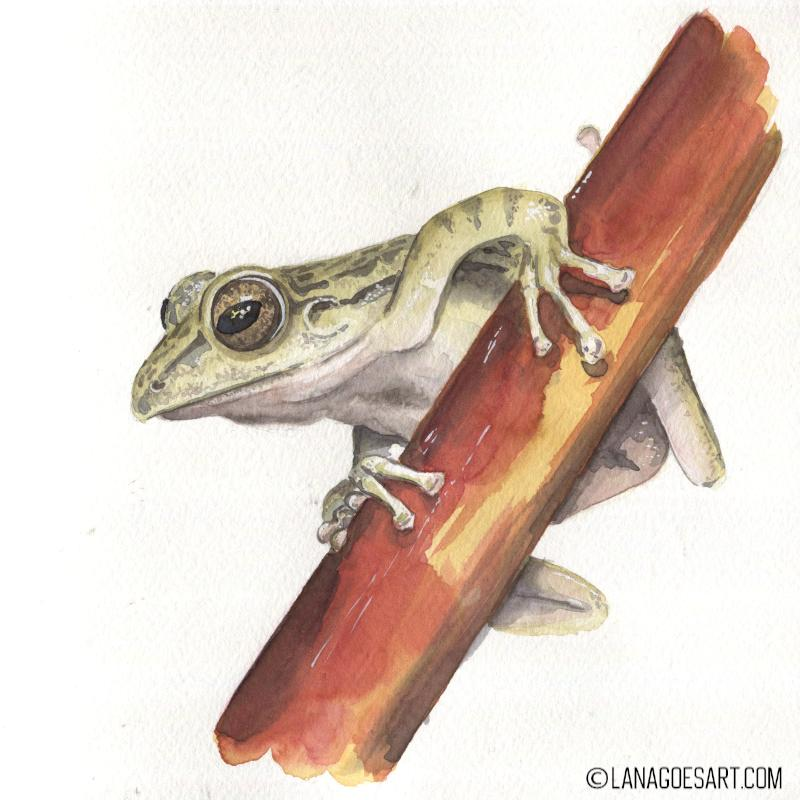
With white gouache, best is Titanium White as it’s most opaque, a white gel pen or ink, whatever you have on hand, add highlights with a small brush. Add them on the eye and dots in strategic areas on the skin to show that it’s wet and reflecting light nicely.
Hope you enjoyed painting with me. If you feel inspired and look for more tutorials, I have some for you here.
Optional: Background
This step is optional and it’s up to you if you want to add a background or not. If you like to do it, you can use either a mix of yellows, greens and deep browns for a natural look or go with a very light wash just to give the frog a little background.
Consider that it should be either lighter or darker than the frog itself, which is the middle tone, to create enough contrast. If it doesn’t the painting looses the focus and won’t look as impressive, as your work is by now!
I chose my background to stay white and painted this in a sketchbook. Remember, it’s up to you, how you want your piece to look.
See you next month for another live tutorial on twitch, join also my other social media for more videos, tips and nerdy art talk.
Bye!